


Students will investigate the concept of measurement and the various attributes of objects to measure. Students will
- identify the attributes of the objects to be measured and select the appropriate units of measurement.
- understand how to use a ruler to measure length.
- measure to the nearest quarter-inch and centimeter.
- How precise should measurements and calculations be?
- In what ways are the mathematical attributes of objects or processes measured, calculated, and/or interpreted?
- What does it mean to analyze and estimate numerical quantities?
- What makes a tool and/or strategy suitable for a certain task?
- When is it appropriate to estimate versus calculate?
- Why does "what" we measure affect "how" we measure?
- Area: The number of square units needed to cover a flat surface.
- Estimate: A rough judgment or calculation.
- Mass: The amount of matter that makes up an object. Typically measured in grams.
- Volume: Measure of how much space is contained within, or occupied by, a
three-dimensional shape.
- Weight: The amount of gravitational force applied to an object. Typically measured in pounds.
- ruler (with quarter inches and centimeters)
- yardstick (optional)
- white sheet of blank paper
- Attribute Pictures (M-4-1-1_Attribute Pictures)
- Inch Ruler (M-4-1-1_Inch Ruler)
- Blank Ruler (M-4-1-1_Blank Ruler)
- Measuring Lines worksheet (M-4-1-1_Measuring Lines and KEY)
- Conversions for Linear Measure worksheet (M-4-1-1_Linear Measure Conversions and KEY)
- Exit Ticket (M-4-1-1_Exit Ticket and KEY)
- Conversion Task Card (M-4-1-1_Conversion Task Card)
- Monitor student replies during the Attribute Pictures activity (M-4-1-1_Attribute Pictures) and use this information to decide whether more practice or challenge is required.
- On the Measuring Lines worksheet, students should be able to precisely measure to the nearest ¼ inch and centimeter.
- Facilitate students' responses to questions and use this information to determine whether a change in strategy is required.
- Use an exit ticket to assess students' understanding at the end of the lesson.
Active Engagement, Modeling, and Formative Assessment
W: Begin the lesson by introducing students to the concept of measurement. Different attributes, such as length, width, mass, volume, temperature, and so on, are measured with various equipment, including rulers, scales, thermometers, and so on.
H: Present pictures of several common iems, identify what attributes can be measured for each item, such as length, width, height, volume, and area, using appropriate units of measurement.
E: Focusing on length and width, identify the length and width measures on a ruler, including inches and centimeters.
R: Distribute the Measuring Lines Worksheet. Ask students to measure the lines in inches or centimeters as stated. If students finish quickly, ask them to draw a line of a given length and have a partner check their work.
E: Have students complete the exit ticket for this lesson to check their understanding of the measuring techniques covered.
T: Have students collaborate with a partner to draw lines, measure their lengths, and check each other's work. As students gain proficiency, measure classroom items to the nearest inch, then half inch, and finally quarter inch. If students are ready, they can proceed to learn how to convert inches to feet or yards.
O: This course focuses on the concept of measuring and introduces a variety of measurement tools.
"In today's lesson, we will look at the concept of measuring. We can measure different items based on their attributes. An attribute is a feature of an item. For example, we may measure an object's length, width, height, mass, capacity/volume, area, and temperature. We can also measure time. Different attributes are measured using various tools such as a ruler, scale, thermometer, or clock, as well as units such as inches, pounds, degrees, or minutes.
"There are different units of measurement we can use based on an object’s attributes. You wouldn't necessarily want to measure the length of a piece of notebook paper in the same unit of measurement as you would measure the length of a football field. Similarly, you would not necessarily want to measure the mass of a paper clip using the same unit of measurement as you would measure the mass of an elephant. Let's have a look at some pictures and decide what attribute of the thing you can measure and what unit of measurement to use." (M-4-1-1_Attribute Pictures) Display pictures where students can see them. Record the attributes that students choose, as well as the various units of measure that can be used. Encourage students to generate as many different units as possible.
Possible responses: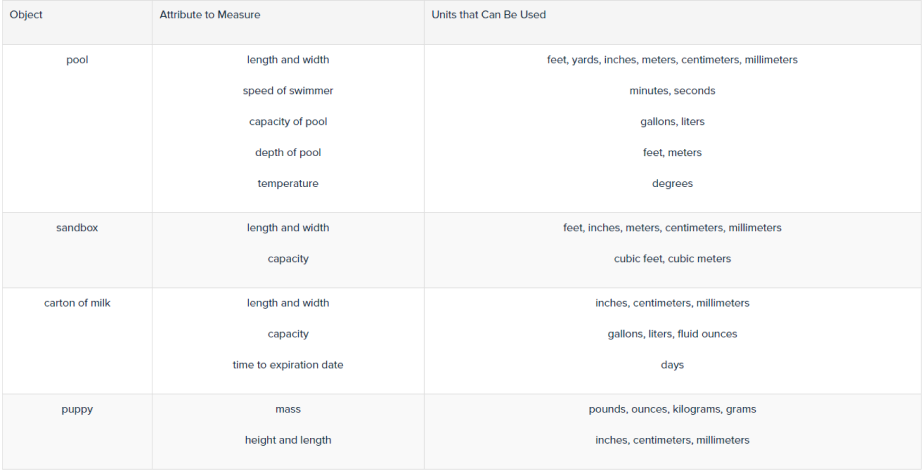
"In the following section of the activity, we will actually measure some objects. We will focus on the attributes of length and width. We will use a ruler to measure. We shall use inches and centimeters as measurement units. Remember that there are two common measurement systems: the U.S. customary units of measure and the metric system of measure. Inches are a part of the U.S. customary system, while centimeters are a part of the metric system. The United States is one of the few places in the world that still use the U.S. customary units of measurement. The metric system of measurement is widely used throughout the world."
Make sure that each student has a ruler with inches and millimeters. Model using a ruler and explain to students the following:
A ruler is a tool to measure length.
A ruler is typically 12 inches in length, or one foot.
A ruler can also be marked in centimeters.
A ruler has a start point. Sometimes it is the edge of a ruler, and sometimes it begins with 0. It depends on how the ruler is labeled. Every time you use a different ruler, double-check the starting point.
Using the Inch Ruler (M-4-1-1_Inch Ruler), demonstrate students how the ruler is divided into various units of length. Begin with the customary unit of measurement. Show the markings for an inch, half-inch, and quarter-inch. To reinforce this concept, use the Blank Ruler (M-4-1-1_Blank Ruler) to examine the markings without labeling. Remind students that the ruler has other marks that can be used to measure to the nearest eighth and sixteenth inches, but at this time, students are only responsible for knowing the quarter-inch markings.
"Remember that an inch can be divided into halves and quarters. Assume the piece of paper I am holding is 1 unit long. For now, let imagine that the paper represents 1 inch. (Use any blank sheet of white paper.) "If I fold the paper in half and then unfold it, the crease indicates the ½ inch mark. The 1 (or numerator) represents the part, whereas the 2 (or denominator) represents the number of parts that make a whole. If I fold the sheet of paper back in half and then in half again, I am dividing the inch into fourths, quarters, or 4 equal parts. When I unfold the sheet of paper now, I see two new creases. The first new crease represents ¼ inch. Consider how the ½ inch crease could be labeled 2⁄4 inch. There is still one crease that has not been labeled; the third crease represents ¾ inch."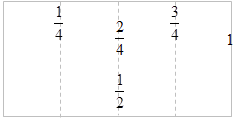
At this point, students may benefit from repeating this assignment independently. Allow them some time to complete the task. It doesn't matter what size paper students use. Just remind students that the piece they're using represents one inch and it is not to scale. If students use the same size paper, they can put their pieces side by side to see the pattern how a ruler is made.
"On a ruler, each inch is marked similarly. The length of the markings on the ruler might help you determine the size of an object. For a half inch, the inch is divided into two equal sections, so look for the marking in the middle of the inch markings. For a fourth inch, the inch is divided into four equal sections. Look for shorter markings between the inch and half-inch markers. Centimeters can be broken into smaller sections known as millimeters. Each centimeter has 10 millimeters, which are represented as 10 small marks in between each centimeter on a ruler. When measuring lengths in centimeters, it is often best to give your answer to the nearest whole centimeter, plus any additional millimeters. Measuring objects requires practice.”
Give each student a Measuring Lines worksheet (M-4-1-1_Measuring Lines and KEY). Remind students to measure to the nearest ½ inch or millimeter, depending on the directions. Monitor students' accuracy while they are working. Provide on-the-spot assistance for students who are not using rulers appropriately or accurately. To test understanding, ask students questions like the ones mentioned below while they are working.
Where is your ruler's starting point? How do you know? (depends on the ruler, it could be the left edge or the first marking)
What side of the ruler do you use when measuring length in inches? What about centimeters? (the inch side; the centimeter side)
How do you measure the length of a line to the nearest ¼ inch? (First, count how many full inches the length is. Then, measure the remaining part by determining which quarter mark (¼, ½, ¾) the length is nearest to.)
How do you know which is the nearest ¼ inch? (Look for the quarter mark (¼, ½, ¾) that the end of the line you are measuring is nearest to.)
How do you know where ½ inch is located? (the middle mark between 0 and 1 inch)
If you wanted a line that measured 5¾ inches long, where would that be on your ruler? (beyond the 5-inch mark, to the third-quarter point before the 6-inch mark)
How can you measure to the nearest millimeter using centimeters? (First, count how many full centimeters the length spans. Then, count the millimeter tick marks until you get to the end of the line you're measuring.)
Where would you find a 3 centimeter-long line on your ruler? (at the 3-centimeter mark, halfway between the 2 and 4-centimeter marks)
Encourage students who complete early and demonstrate skill to find a partner. Give partners a target number, such as 5½ in., 6 cm, 8 in., or 2 cm and 7 mm. Have each student try to draw a line that is approximately that length. Then, have students switch with their partner and measure the lines. See how close each student estimated the length while measuring to the nearest ¼ inch or centimeter (with millimeters). By the end of the lesson, ensure that all students have been introduced to this task and can begin to make reasonable length estimates.
Students can complete an exit ticket (M-4-1-1_Exit Ticket and KEY). An exit ticket is a strategy for quick formative assessment. With 5-10 minutes left in class, students can be given an exit ticket to turn in before leaving. Examine student replies for thoroughness and accuracy to evaluate which students have a strong understanding of the concept and which students may need addition support.
"Today we focus on measuring the length of objects to the nearest ¼ inch and centimeter (with millimeters). To get an exact length measurement, you must use and read your ruler accurately.”
Extension: Use the following strategies and activities to meet the needs of your students during the lesson and throughout the year.
Routine:
Option 1: Show students a randomly drawn line on a piece of paper. Ask students to estimate its length to the nearest ¼ inch or centimeter. Then, have a student demonstrate how to measure the line to the nearest ¼ inch or centimeter using a ruler. Students can check their estimates.
Option 2: Have students work with. Ask students to draw a line on a piece of paper and trade it with a partner. Students can measure each other’s lines to the nearest ¼ inch or centimeter. Then students can switch back and compare their measurements. This activity provides immediate feedback.
Small Group: Students may need to go back and practice measuring to the nearest inch to get mastery in this skill. Students may be asked to measure the lengths of objects in the classroom or lines drawn on a piece of paper. Once students have demonstrated competency in measuring to the nearest inch, they can be asked to measure to the nearest ½ inch. This will help students become more comfortable with the ruler and its markings. Once students are comfortable measuring to the nearest ½ inch, reintroduce the markings they used to measure to the nearest ¼ inch. Use the Inch Ruler to emphasize the many markings on a ruler.]
Expansion: Students who are proficient in linear measurement can expand their knowledge by converting inches, feet, and yards. A general rule for students to remember is to multiply or add multiple times when converting from greater to lesser units of measurement. When converting from lesser to greater units of measurement, divide or do repeated subtraction. Students can use a ruler and yardstick, if available, to calculate that there are 12 inches in a foot, 36 inches in a yard, and 3 feet in a yard. Students should practice conversions using the Conversions for Linear Measure worksheet (M-4-1-1_Linear Measure Conversions and KEY).
Post responses where students may examine their own work and receive immediate feedback. The following website is similar to a Memory Game, in which students match U.S. customary conversions: http://www.quia.com/cc/65838.html. Students can click on “show answers” to see conversions if they need that type of support.
Students can then explore various forms of conversions, such as minutes to hours, and design challenges for their classmates to solve. Students can record their problems on a Conversion Task Card (M-4-1-1_Conversion Task Card). After exchanging with a partner for immediate feedback, students can check their work by folding back the answer.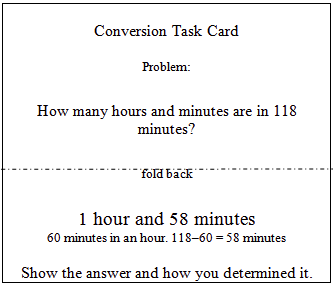
This lesson focuses on the concept of measuring. Students will demonstrate a general understanding of the appropriate units for measuring length, mass, volume, area, and temperature. Students are not need to take real measurements in these many areas; rather, they should be familiar with the various units that can be used. Linear measurement will be focus, with students using a ruler to measure items to the nearest ¼ inch and centimeter.

Measurement: Appropriate Units and Conversion
This is an educational worksheet focused on measurement, appropriate units, and conversion. It includes learning objectives, lesson core questions, a vocabulary section defining terms like area, estimate, mass, volume, and weight. It also lists required materials such as a ruler with quarter inches and centimeters, an optional yardstick, blank paper, attribute pictures, and an inch ruler.
Grade Level Suitability:
This worksheet is suitable for grades 4-6. It introduces concepts of measurement, units, and conversion, building on prior knowledge of basic measurement and introducing more complex units and concepts. The vocabulary and core questions require analytical thinking appropriate for these grade levels.
Why Use It:
This worksheet helps students investigate the concept of measurement and the attributes of objects. It encourages students to identify appropriate units of measurement, understand how to use a ruler, and measure to the nearest quarter-inch and centimeter. It also promotes critical thinking through core questions and vocabulary building.
How to Use It:
Use this worksheet as a guide for a lesson on measurement. Begin by reviewing the objectives and discussing the core questions. Introduce the vocabulary terms. Then, using the listed materials, conduct hands-on activities where students measure objects and select appropriate units.
Target Users:
This worksheet is designed for elementary school teachers and students in grades 4-6 who are learning about measurement, units, and conversion. It can also be used by homeschooling parents or tutors to supplement their lessons.
