


This lesson introduces the basic building blocks of geometry: points and lines. After this lesson, students will be able to:
- explain points, lines, line segments, and rays using proper vocabulary and notation.
- What are the fundamental building components of all geometric forms, and how do we accurately and exactly communicate them to one another?
- Line: A straight path extending in both directions with no endpoints.
- Line Segment: A part of a line with two endpoints.
- Parallel Lines: Lines that never intersect and are always the same distance apart.
- Plane: A flat surface that extends infinitely in all directions.
- Ray: A straight path extending in one direction from a given point.
- Intersecting Lines: Two lines that share one or more points in common.
- Angle: Two rays that start from the same common point.
- Point of Intersection: The point where two lines meet.
- Perpendicular Line: A line that intersects another line at a right angle.
- Acute Angle: An angle that is smaller in measure than 90 degrees, but is greater than 0 degrees.
- Obtuse Angle: An angle that is larger in measure than 90 degrees, but smaller in measure than 180 degrees.
- Straight Angle: An angle that measures 180 degrees.
- Vertex: The common point shared by the two rays or line segments that make up an angle.
- Collinear: Three points are said to be collinear if all three of the points lie on the same line.
- Coplanar: Objects that lie in the same plane.
- Right Angle: An angle that measures 90 degrees.
- pennies (or other small, round, flat objects), approximately 10 for each student
- string (piece for each student, approximately 1 foot in length)
- copies of Line Drawing Example (M-G-1-1_Line Drawing Example)
- copies of Lesson 1 Exit Ticket (M-G-1-1_Lesson 1 Exit Ticket)
- copies of the Angles reference sheet (M-G-1-1_Angles)
- one copy of pennies sample for teacher reference (M-G-1-1_Pennies Sample)
- Examine student drawings for labels to ensure that things labeled as point lines and planes are identifiable as such. Objects depicted as points must show position, lines must indicate position and length, and planes must indicate location, length, and width. Dimensions do not always have to be specified in terms of measures for the things that are drawn.
- In Lesson 1 Exit Ticket (M-G-1-1_Lesson 1 Exit Ticket), students will demonstrate their mastery of fundamental geometric principles by identifying one real-world example of a point, line, line segment, intersecting lines, and parallel lines.
Active Engagement, Modeling, and Explicit Instruction
W: This lesson aims to provide students with a fundamental grasp of points, lines, line segments, and rays, as well as their relationships.
H: The pennies and points group activity encourages students to consider the connection between abstract concepts such as points, lines, and directions and tangible concepts like solid objects and distances.
E: To visualize the changing size of an angle as its rays travel closer or farther away, students might use the angle identification handout. Following the companion activity, students are encouraged to examine one another's representations of angles, lines, and points.
R: To communicate their results to the class, students must first understand their own mental representations of concepts and relationships. Using their own examples of real-world applications allows them to demonstrate examples with several geometric shapes (for example, structures with parallel lines and acute angles).
E: The lesson's Exit Ticket provides a summary of key topics and examples. Use wrong individual responses to clear out broader misunderstandings.
T: This lesson employs several teaching styles and caters to diverse learners. Students are kinesthetically engaged, illustrating points and lines using coins and twine. They are also verbally engaged when they display their line drawings to the class. The line drawings also foster nonlinear reasoning and promote a less formulaic approach to the training.
O: Students learn new topics independently, work in groups to further explore them, and ultimately present their line drawings to the class. They do this both individually and in groups.
Begin by asking students what they know about a point (e.g., What does it look like; What are its properties?). (Student responses may include: it has no definable dimensions of width, length, or height; it resembles a dot; etc.) Explain to students that we will use a penny to represent a point.
Give each student a supply of pennies (around 10 per student). Each student should lay two pennies on his or her desk, representing two points. Use the pennies sample to get an idea of how they should look when set on the desk (M-G-1-1_Pennies Sample).
Instruct students to use more pennies to connect the original two points. Allow students to interpret the word connect in any way they like; they are not required to draw a straight line of pennies connecting the two pennies. Discuss the various student solutions and meanings of the word connect.
Now, have students connect their two points with as few pennies as possible. Ask them to make observations about how the pennies are arranged on their desk. Observations should include that the pennies form a straight line, that they used a minimal number of pennies, etc.
Identify the line of pennies that connects the two original points as a line segment. Ask students the following questions to help them understand the relationship between points and line segments:
"What is your line segment made of?" (pennies/points)
"Is there another line segment you can make to connect the two points?" (no)
Lead into the concept of lines (as opposed to line segments) by asking the following questions:
"How much longer could you make your line segment?"
"Could you make it extend forever if you had enough pennies?"
A line is defined as a line segment that exists indefinitely, with no beginning or end.
Ask students what they name a beam of light from the sun (ray). Consider whether a sun's ray has a beginning and an end if it continues into space. Use this idea to describe a ray as a line segment that extends indefinitely from only one endpoint.
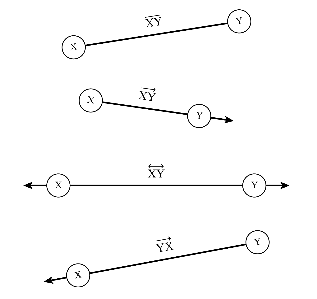
Designate one penny as point A and the other as point B. On the board, write the notations for line segment AB (\(\overline{AB}\)), line AB ![]() ray AB
ray AB ![]() ray BA
ray BA ![]() and measure of line segment AB (m(AB)). Ask students which of these most likely represents the line segment, which represents a line, which represents a ray. Request feedback from students on the final notation (line segment measurement). Explain what it is and how it differs from the notation used for line segment AB. (Possible answers: m stands for measure; there are no arrows or lines over it.) Please see the diagrams below for reference.
and measure of line segment AB (m(AB)). Ask students which of these most likely represents the line segment, which represents a line, which represents a ray. Request feedback from students on the final notation (line segment measurement). Explain what it is and how it differs from the notation used for line segment AB. (Possible answers: m stands for measure; there are no arrows or lines over it.) Please see the diagrams below for reference.
Ask students to calculate the length of their line segments in pennies (e.g., my line segment is 10 pennies long).
Allow students to consider each of their line segments made of pennies. Ask students:
"Do any of these line segments intersect?" (no)
"Does this mean that they are parallel?" (no)
"Why not?" (Parallel indicates they are the same distance apart along the entire path.)
"If each of these line segments were extended into lines, would they intersect?" (Yes, since they're not parallel.)
Choose two students and give them string to extend their penny lines till they intersect.
Now, draw the following![]() .
.
Distribute copies of the angle identification masters (M-G-1-1_Angles) to the students, and have them analyze the different angles. Explain to students that angles are produced when two rays connect at the same starting point and are measured by the amount of rotation they cover. 360 degrees is the angle required to complete a full rotation. If required, demonstrate angle measurements with a protractor. Explain to students that acute angles are any angles that are less than 90 degrees but more than 0 degrees. Also, clarify that obtuse angles are any angles with an angle measurement between 90 and 180°. Have students examine the various angles on the page to see what examples of each type of angle look like.
After students have examined the angles, let them explore the room to determine the various angles of items. Most of the objects they find will have ninety-degree angles.
Point to one of the ninety-degree angles that students have identified and ask them to look at the point where the two rays that make up the angle meet. Explain to the class that this point is called the vertex of the angle.
Now draw a line on the board, but this time put three points on it. Tell the students that if three points are all on the same straight line, they are said to be collinear. However, not all three-point sets are collinear (as seen by drawing three points in a triangle shape. No matter how hard you try, you can't connect all three points with a straight line.) Now, have students draw three random points and see whether they can connect them all with the same straight line.
Pair students and draw various items in the classroom that are made up of straight lines (e.g., black/white board, edges of walls, floor, ceiling, desks, doors). Encourage partners to draw at least three different objects, pointing out those that do not have parallel or perpendicular lines. Next, students should label each intersection with a different letter. Ask them to list each line segment in the drawing. Then ask students to identify any line segments that appear to be parallel. Finally, have students measure the length of each line segment (the actual line segment in the room, not the one drawn on paper) and record the measurement (M-G-1-1_Line Drawing Example).
Allow a few students to present their results. Check for appropriate use of notation (verify that students can distinguish between the object and the measurement of the object). Explain to students the existence of line segments in the real world. Consider the prevalence of parallel lines: "Why are so many things in the world parallel or nearly parallel?" (helps with construction, creates solid structures, etc.). Encourage the audience to ask each presenter for clarification or explanations on vertices, line segments, and parallel lines.
As an exit activity, have students write on a piece of paper one real-world example of each: point, line, line segment, ray, intersection, parallel lines.
Alternatively, give students a Lesson 1 Exit Ticket (M-G-1-1_Lesson 1 Exit Ticket) to complete and turn in as they leave class.
Extension:
Ask students to visualize the hands of an analog clock at 8:45. Leaving the hour hand unmoved in the same location, what is the angle measure between the minute hand an hour hand at 9:00? at 9:15? at 9: 30? [90 degrees, 180 degrees, 270 degrees]
Point out to students that angles greater than 180 degrees are known as reflex angles and can be expressed by subtraction from 360 degrees. For example, subtracting 270 degrees from 360 degrees yields 90 degrees, which is the angle measured between 9 and 6 on an analog clock.
Determine the equivalent angle measure for the following reflex angles.
1. 350 degrees [10 degrees].
2. 183 degrees (177 degrees)
3. 370 degrees [10 degrees].
4. 720 degrees [0 degrees].

Point and Line (M-G-1-1)
This lesson introduces the basic building blocks of geometry: points and lines. After this lesson, students will be able to:
- explain points, lines, line segments, and rays using proper vocabulary and notation.
